
2. User Guide
Describing Elecard CodecWorks
Elecard CodecWorks is a professional software solution for encoding/transcoding, real-time multiplexing into MPEG-2/AVC/HEVC with up to 16K resolution supporting multiscreen encoding and HLS/MPEG-DASH adaptive streaming technologies. CodecWorks operates on the base of a wide range of hardware.
Activation
There are the following ways to activate Elecard CodecWorks:
HWkey License — a unique identifying code is compiled using a special utility based on the target PC hardware configuration, and CodecWorks build is tied to this code. To receive the utility, contact Elecard Technical Support Team or your project coordinator;
HASP License — Elecard mails a HASP key which has a unique code and should be plugged into a PC where CodecWorks is going to be used.
Licensing and Technical Support
Elecard CodecWorks is available as a demo version or a registered product. By installing, copying, or otherwise using the SOFTWARE PRODUCT or any UPDATES, you agree to be bound by the terms of the “Elecard” End-User License Agreement (“EULA”). This EULA is a legal agreement between you (either an individual or a single entity) and Elecard for the “Elecard” software product(s) accompanying this EULA, which include(s) computer software and may include “online” or electronic documentation, associated media, and printed materials (“SOFTWARE PRODUCT”).
System Requirements
When choosing servers for CodecWorks, the following should be taken into consideration:
CPU performance is of crucial importance for real time encoding processes. Take it into account when you choose hardware for the encoding server.
The disk selected for the program installation should have enough free space for saving the system log (for highly detailed logs) and memory dump files (if the application fails or abnormally closes).
QuickSync hardware accelerated encoding requires an integrated Intel® Graphics processor.
Nvidia hardware accelerated encoding requires an Nvidia graphics card.
To manage an encoding server via the SNMP protocol, the corresponding service must be installed in the system.
System requirements depend on several factors:
the task type (encoding, transcoding, multiplexing, etc.);
the format, resolution and bit rate of input/output streams;
signal processing functions (frame size changing, deinterlacing, frame conversion, etc.);
the number of channels to be processed.
The minimal system requirements recommended for proper operation of Elecard CodecWorks:
Windows 10/11/ Server 2019(64 bit), Linux Ubuntu Desktop/Server 22.04/24.04
SSD/HDD from 256 GB
RAM 16 GB (two-channel mode is required)
CPU encoding |
GPU encoding (Intel QuickSync) |
GPU encoding (Nvidia) |
CPU (Intel from 4 gen, Xeon e7/5/3 v3 and higher, Xeon E/W/D, AMD zen gen and higher) |
CPU (Intel from 5 gen, Xeon e3, Xeon E) |
CPU (Intel from 5 gen, Xeon e3, Xeon E) |
Graphics card is not required |
An integrated or discrete Intel Graphics |
Nvidia card |
CodecWorks outgoing traffic:
1535/TCP (required), 53700/TCP (optional) — used for communication between the different CodecWorks services on the network.
1545/UDP (required) — used to discover other CodecWorks services in the network.
8088/HTTP/HTTPS (required, default) — used for communication with the browser as well as for downloading logs and task configurations.
8080/HTTP — used for the OTT pull mode streaming.
162/UDP (default) — used for sending SNMP trap messages. A port can be configured on the SNMP notifications settings page.
Installation
Follow the installation procedure as described for your operating system:
Windows
Run Elecard CodecWorks Setup and follow the instructions.
The software will be installed to
C:\Program Files\Elecard\Elecard CodecWorksThe created schemas will be saved to
C:\ProgramData\Elecard\CodecWorks
Ubuntu
Before installation, we recommend to run the following commands:
sudo apt update
sudo apt upgrade
To install all packages 1 at once, run the installer:
sudo apt install ./Elecard-CodecWorks*.deb
/usr/bin/Elecard/CodecWorks./etc/Elecard/CodecWorks.Note
For correct installation, Internet access is required to download dependencies. However, our technical support team can prepare a standalone package for your server in case there is no direct access to the Internet.
- 1
Installing CodecWorks on Ubuntu involves installing the following parts:
Server — the server part of CodecWorks responsible for the work of tasks, transcoding/multiplexing.
Base — the base installation includes a console manager for managing CodecWorks; this option is suitable for scripting.
GUI — the graphic control application. Optional installation.
Web — the web interface.
Additional Driver Installation
Drivers for Intel QS Ubuntu
sudo apt install libdrm2 libva2 libva-drm2 libigdgmm12 intel-media-va-driver-non-free libmfx1
sudo usermod -a -G video <user>
sudo usermod -a -G render <user>
sudo reboot
Specify a real username instead of <user>. To validate the driver installation, use the command:
sudo vainfo
Drivers for Nvidia Ubuntu
sudo apt install nvidia-cuda-toolkit
To validate the driver installation, use the command:
sudo vainfo
Decoding AC3 Audio
sudo apt install gstreamer1.0-libav
Deletion
To remove Elecard CodecWorks from your computer, follow the steps that are described for your operating system:
Windows
Open the folder
C:\Program Files\Elecard\Elecard CodecWorksand run Uninstall.exeTo complete the uninstallation of Elecard CodecWorks, follow the onscreen instructions.
Ubuntu
Run the following command:
sudo apt remove elecard-codecworks*
Features
CodecWorks provides the following functionality:
Adaptive streaming support over HLS/MPEG-DASH protocols;
Encoding schemas configurator;
Centralized control over several encoding servers via GUI and web-interface;
Accelerated GPU-based encoding for highest density possible;
A mechanism for quick back up in 1+1, N+1, N+M modes;
Redundancy mode and immediate automatic failover to a redundant source in case of input stream absence, CC errors, or if PID loss occurs;
Seamless stream redundancy via the SMPTE-2022-7 protocol;
Error notifications over the SNMP protocol;
Activation of the Color Bar Generator in case of stream input absence, CC errors, or if PID loss occurs.
Stream encryption using a BISS key or CAS SimulCrypt;
Ability to overlay the logo, change resolution and frame rate, convert interlaced video to progressive video, adjust audio levels.
Product Structure Description and Module Purpose
One operating system may contain only one encoding server that comprises the following modules:
Encoding console is a software designed to create (start) an encoding schema. It receives and processes control commands from the manager (via an intermediary layer, i.e. CodecWorks dispatcher), as well as controlling license restrictions. Depending on the number of licenses purchased, one or more consoles are started per server. An encoding console is represented by a task in the web interface.
Dispatcher is a software (a console or a system service, depending on the user’s choice) that monitors encoding consoles, their initial startup, emergency restarts, communication with other devices on the network. It also obtains the server load statistics. One channel manager is run on one server.
Watcher is a software (a console or a system service, depending on the user’s choice) that monitors the dispatcher operation and its emergency restart. Watcher, dispatcher, encoding consoles can be started as a system service or console applications, depending on the user’s choice.
CodecWorks Manager is a GUI software that controls encoding console operation, configures and starts encoding schemas according to user actions, and collects statistics. One manager can be used to control multiple servers.
CodecWorks Manager (console) is a console application for controlling the operation of the encoding server from the command line.
Encoding schema is an XML document that contains all the information about the structure of a DirectShow encoding graph or a GStreamer pipeline and its settings (it is similar to a GRF file used by the Graph Edit application). Usually, the schema can only be used on a specific server and with a specific input stream.
Encoding schema configurator is a module designed to create encoding schemas based on a set of predefined sections. Each section is a fragment of an encoding graph describing its structure and parameter values, designed to perform a specific function (stream reception, decoding, encoding, etc.). In addition, templates can be used to prepare schemas.
Template is an XML document that is used for creation of encoding schemas. It contains a limited set of sections defining the range of encoding tasks for which the template is designed. The use of templates is advisable in cases when complex non-standard encoding schemas are required. Templates are prepared by Elecard specialists.
Web Interface
Authentication and Managing User Roles
The Administrators group is default and cannot be deleted. To create a new group, click the Add Group button, and specify the group name. To save changes, click the Apply button. When clicking a group, its settings will open in the right part of the page. In the Permissions tab, you can set permissions for actions with the CodecWorks service and with encoding consoles.
In the Users tab, the members of a chosen group are listed. In this tab, you can create users or change their passwords. To set a new password, select a user and click the  icon. Type in the old password, then fill in a new one and confirm it. Click Apply.
Task Configurator
To open the task creation page, click the Create Task button on the Home page. The page contains the Source, Transform, and Output columns. To the right is a panel for working with the settings of elements that will be added to the columns. You can change the task name in the field above the panel.
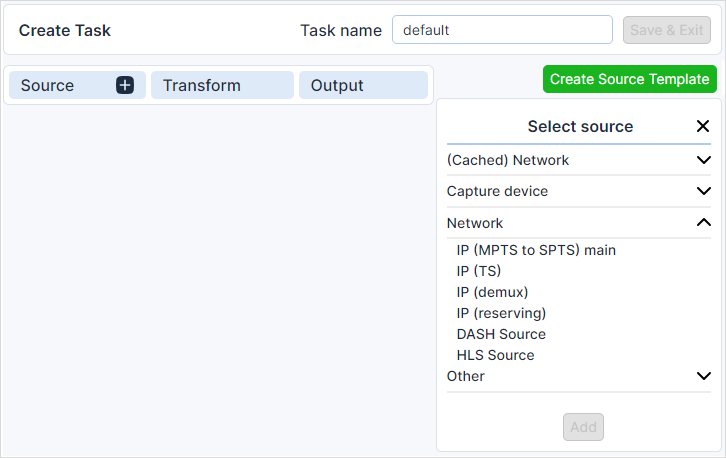
First, add a source. Select a protocol on the panel to the right and click the Add button. Fill in the source data and click the green circle with a check mark. The IP (demux) source type implies UDP/RTP/SRT/RIST protocols with subsequent demultiplexing for further stream processing.
You can create a source template to avoid inputting data each time. To do this, click the Create Source Template button without selecting a source. Select a protocol and input data as described above. Then provide the template name and click Save & Exit. The source template will be saved in the (Cached) Network section.
After inputting and confirming data, CodecWorks will try to receive a stream and show available services of the source. If you click the downward arrow to the right of the service name, a list of all its elementary streams will open.
To the left of each service or stream name, there is a checkbox. You can add a service or a stream to the transform stage by ticking the corresponding checkbox. Alternatively, to exclude a service or a stream from the schema, deselect the checkbox. Confirm your choice by clicking on the green circle with a check mark.
Next, proceed to transcoding settings by clicking on the element in the Transform column. On the panel to the right, you will see elementary streams for a certain service, the name of which will be above the list of streams. If you have selected multiple services during the previous stage, you will see multiple names. You can switch to another service by clicking on its name. For each elementary stream, select the required encoding format. Next, select a streaming protocol in the elementary video stream and click Apply to all.
Go to the Output column and fill in the fields required for streaming. If necessary, change the schema name; then click Save & Exit. The created task will appear in the list of inactive tasks on the home page.
You can add tasks with a redundant source. To do this, add a second source with the IP(reserving) type before saving the task. Specify the fields required for a redundant source, and CodecWorks will make this source redundant.
Note
To prepare multi-bitrate tasks, the templates for multi-profile tasks should be added to the installation packet. You can contact technical support to add the necessary templates for a specific task.
Managing Task
As soon as the task is created, it appears in the Inactive Tasks list. To the left of each task name, there are management buttons.
For new tasks that have never been started, the Start  and Prepare
  buttons will be displayed.
When clicking the Prepare button, the coding schema is uploaded to the console but is not run.
Thus, you can view the schema and edit it before starting, if necessary.
If you want to run the task without viewing and editing the schema, click the Start button.
buttons will be displayed.
When clicking the Prepare button, the coding schema is uploaded to the console but is not run.
Thus, you can view the schema and edit it before starting, if necessary.
If you want to run the task without viewing and editing the schema, click the Start button.
For tasks that have been started and then stopped, the Start and Restart  buttons will be available. The latter one restarts the coding console.
After you start the task, it will appear in the Active Tasks list, and the Start button next to it will be replaced with the Stop
buttons will be available. The latter one restarts the coding console.
After you start the task, it will appear in the Active Tasks list, and the Start button next to it will be replaced with the Stop  button.
Each task in the list has a checkbox to the left of the management buttons. If you tick the checkbox of a certain task, you will see a panel below that will have the Start, Stop, and Restart buttons for the selected task.
The panel will also have the Rebuild  and Delete
  buttons.
A click on the first button rebuilds the encoding process when the input stream changes.
If you want to delete a task, click the second button.
The panel also holds a box where you can change the task configuration.
buttons.
A click on the first button rebuilds the encoding process when the input stream changes.
If you want to delete a task, click the second button.
The panel also holds a box where you can change the task configuration.
When clicking a task name, a page with the statistics and parameters of this task will open. On this page, you can also view the logs of a particular task.
Configuring Server
In the General tab on the Service Settings page, you can change the Service name, Multicast address for searching CodecWorks services in the network, IP address of a network interface that will be used for that, and IP address of a web interface. The Service start delay (s) parameter specifies the delay before starting a CodecWorks service.
Note
When 0.0.0.0 is specified as the network interface, all available network interfaces will be used.
Configuring Service Redundancy
In the Source Redundancy tab on the Service Settings page, you can change the settings of conditions under which CodecWorks switches to a redundant source. A failover to a redundant source occurs when one of the following events takes place:
CC Errors — a failover occurs if 15 or more errors are detected every second for 5 seconds. The state ends when no errors are detected for 10 seconds.
No video signal for/no audio signal for — implies the PID Loss/PMT changed states and the absence of audio/video data for 3 seconds. The state ends when video data becomes present for 3 seconds, and audio data is present for 2 seconds.
In case the source has not any redundant sources, and one of the events occurs, the CBG will be enabled if it is allowed in the task.
The Switch back to primary source option allows reverse switching to the primary source when it restores. If this parameter is disabled, the redundant source is considered equal to the primary one, and the failover between two sources occurs only in case of problems with the working stream.
Log and Rotation Settings
In the Logging tab, you can specify a folder for storing log files. Also, you can set logging levels for dispatcher, SNMP, access, and server events. When setting up consoles, you can specify the same logging level for all consoles or select a logging level for a certain console.
In the Rotation tab, you can set a storage period and size for the following files:
Log files — system messages recorded into the log.
Crash dumps — process dumps created in various situations caused by incorrect operation.
Redundant copies of schemas — schemas saved as backups in the console
/backupfolder after each schema setting change so that these changes can be reversed.
You can also specify a rotation period for log files, which is measured from the moment the dispatcher starts. During rotation, the storage period and file size thresholds are checked. Files exceeding the thresholds will be deleted.
SNMP
Configuring the SNMP Agent
Install the SNMP service:
sudo apt-get install snmpd
Specify a community and path to a CodecWorks agent in the etc/snmp/snmpd.conf file:
rwcommunity elecard
rocommunity elecard
Indicate a network interface address for the SNMP agent:
agentaddress interface address,[::1]
At the end of the file, add the path to the agent:
dlmod libcwSnmpAgent /bin/Elecard/CodecWorks/libcwSnmpAgent.so
Restart the SNMP service:
sudo systemctl restart snmpd.serviceNote
If you reinstall Elecard CodecWorks in the future, it is necessary to restart the SNMP service too.
Configuring SNMP notifications
CodecWorks offers a possibility to send SNMP notifications to a desired trap point. They are used to report about problems related to an input stream, the start/stop of encoding schema work, a failover to a redundant source, etc.
The installed version of CodecWorks contains two MIB files:
To configure SNMP notifications, go to the SNMP Settings section on the Service Settings page. The section contains the Community Settings and Severity Levels tabs. You can show or hide tabs using the SNMP Settings checkbox.
In the Community Settings tab, you can create a new SNMP community. To do this, click the Add button, enter the community name and click Ok. Then you need to add a destination address to which notifications for the selected community will be sent. First, click on the plus sign to the left of the created community name to show the list of destination addresses. Then, click the Add button, enter the address and port; click Ok. If you need to use multiple addresses, repeat adding destination addresses.
The Severity Levels tab contains the Task States and Events sections. In these sections, you can set up sending notifications for task states and events that should be tracked.
Events are mostly connected to a state change, e.g. a failover to a redundant server. The notifications of this type come only once. To enable tracking of a certain event, tick the checkbox to the left of its name and select the severity level of the event.
Task States have both active and cleared levels indicating the beginning and the end of an event. The notifications are sent twice: when entering an event based on specific triggers and when exiting the event. To enable tracking a certain state, tick the checkbox to the left of its name and set the severity level in the Active Level and Cleared Level columns.
Structure of SNMP Notifications
There are four types of SNMP trap notifications described in the ELECARD-CODECWORKS-MIB.mib file.
1. Notifications about changing the CodecWorks service state (codecWorksState)
Such notifications characterize a certain state of the service and are sent twice: when an event occurs and when it ends. The notification contains the following fields:
status — a state status (active — if a state has occurred, cleared — if a state has ended);
trapName — a notification name;
trapMessage — a detailed notification description;
severityLevel — a notification severity level;
referenceNumber — a notification sequence number;
sequenceId — a parameter linking the start and end of a state (a state identifier is unique for each pair of notifications).
2. Notifications about an event that has occurred with the CodecWorks service (codecWorksEvent)
These notifications are sent only once when a certain event occurs. Such a notification contains the following fields:
trapName — a notification name;
trapMessage — a detailed notification description;
severityLevel — a notification severity level;
referenceNumber — a notification sequence number.
3. Notifications about a change in the state of CodecWorks encoding consoles (codecWorksChannelState)
Such notifications indicate a certain state of the encoding console and are sent twice: when an event occurs and when it ends. Such a notification contains the following fields:
status — a state status (active — if a state has occurred, cleared — if a state has ended);
trapName — a notification name;
trapMessage — a detailed notification description;
severityLevel — a notification severity level;
channelNumber — an encoding console number;
taskName — an encoding schema name;
referenceNumber — the sequence number of a notification;
sequenceId — a parameter linking the start and end of a state (a state identifier is unique for each pair of notifications).
4. Notifications about events of an encoding console (codecWorksChannelEvent)
These notifications are sent once a certain event happens. Such a notification contains the following fields:
trapName — a notification name;
trapMessage — a detailed notification description;
severityLevel — a notification severity level;
channelNumber — an encoding console number;
taskName — an encoding schema name;
referenceNumber — the sequence number of a notification.
Possible Values of Some Notification Fields
The severityLevel field can take the following values:
ok (1);
warning (2);
error (3);
major (4);
fatal (5).
The values of trapName and trapMessage fields are described in the table below.
trapName |
trapMessage |
Description |
|---|---|---|
Backup server |
Host <host:port> is down, backup started |
Backup server start |
Service start |
Service started |
Service start |
Service stop |
Service stopped. <reason> |
Service disabling |
Console stop |
<reason> |
Stop of encoding console |
Channel error |
<reason> |
Error when transcoding |
Stream switch |
Stream switch |
Switching to other source |
Channel start player error |
<reason> |
Encoding start error |
Channel start error |
<reason> |
Encoding console start error |
Transcoding stop |
Transcoding stopped |
Transcoding stop |
Transcoding start |
Transcoding started |
Transcoding start |
No video signal |
Stream <stream number> - no video |
No video signal |
No video decoded |
Stream <stream number> - no decoded video frames |
Video stream cannot be decoded |
No audio signal |
Stream <stream number> - no audio |
Audio signal is not found |
No audio decoded |
Stream <stream number> - no decoded audio frames |
Audio stream cannot be decoded |
No input |
Stream <stream number> - no input |
Input stream is not found |
No output |
Stream <stream number> - no output on HLS Stream
Stream <stream number> - no output on DASH
|
HTTP protocol error when trying sending a segment |
TS errors |
Stream <stream number> - CC errors |
Errors in transport stream |
Color bar |
Stream <stream number> track <track number> - generating color bar
Stream <stream number> track <track number> - generating silence
|
Enabling the CBG by video or silence in audio streams |
Setting Up Configurations
A configuration is used to specify settings of encoding consoles (tasks), including reactions on certain events. The default configuration is called Common.
You can choose and(or) set up the required configuration on the Service Settings ➝ Configurations page.
Select a configuration from the drop-down list to the right and above, edit the settings if necessary, and click Apply.
The current cofiguration can be downloaded by clicking  .
To upload a configuration, use
.
To upload a configuration, use  .
For deletion, click
.
For deletion, click  .
.
You can create a custom configuration by clicking  Add next to the drop-down list.
Enter the configuration name and click Ок.
If ncessary, add muliple configurations and apply them to different tasks.
Add next to the drop-down list.
Enter the configuration name and click Ок.
If ncessary, add muliple configurations and apply them to different tasks.
Each configuration comprises two groups of settings: Thresholds and Events. Event settings are described in the Events System section.
Thresholds settings comprise the following parameters:
Automatically enable the color bar generator—if a trigger you set up in Events goes off, the video stream will be replaced by an image (color bars, by default), and the audio stream will be replaced by silence.
Restart conditions:
Restart every N minutes—the console will restart at a set interval in minutes.
Restart if CPU usage drops to less than N%—restart the console when the CPU load decreases and remains at this level for the specified time.
Restart if RAM usage rises higher than N MB—restart the console if the RAM usage exceeds the set threshold for the specified time.
Log statistics every N seconds—task statistics will be additionally recorded to the console log at each specified interval.
Level of console logging—levels are cumulative, i.e. the lower
tracelevel includes all the previous logging levels. The recommendedinfolevel is set by default.Input record—lets you record input stream segments. To enable the recording, tick the Enable record checkbox, set the segment size and a period for storing records.
DOT files—allows you to save your task as DOT files, which in turn can provide additional debug info on the internal state of the components. To enable saving, tick the Save DOT file checkbox. In case you run into an issue when launching a task, technical support will need these files to look into the issue.
Enable OTT folder cleaning—automatically deletes HLS/DASH segments in task-specific folders during the restart of the task.
Configuring Server Redundancy
During operation, the backup server monitors the operation of the main server by periodically sending special signals to it and monitoring the receipt of responses. If there are no responses from the main server within a configurable period of time, the redundant server activates pre-configured encoding channels under its control. One redundant server can back up several working encoding servers (N+1 model). Also, multiple redundant servers can serve the same set of working servers (N+M model).
On the Home page, click the Redundancy button to open the redundancy page. It contains two columns:
Main Servers — displays the names of main nodes to be backed up by redundant servers.
Redundancy Servers — displays the names of redundant servers that will start in case of problems with main servers.
You can add one or multiple servers to the list by clicking the Add button. When the list is created, click the Save & Exit button. Server redundancy will be set up.
Note
A server on which the redundancy is configured is automatically included in the list of backup servers by default.
The redundant server will start if connection to the working CodecWorks server is lost, i.e. when the dispatcher of the redundant server stops receiving responses from the dispatcher of the main server.
To switch to the redundant server manually, save the settings, then go to the redundancy page and select the server you want to bring out of operation from the main server list. Next, select a redundant server you want to bring in operation and click the transfer button.
If you click the Settings button on the Redundancy page, the Redundancy Settings window opens. In this window, you can configure the update of schemas on the redundant servers, the timeout for switching to the redundant server, and triggers that will be used for switching.
If the Update schemas on redundant servers by time option is enabled, the encoding schemas for redundant servers are automatically updated at the specified interval after the service start or beginning from the time specified by the user.
Number of failed requests is a number of consecutive failed requests within a TCP session. If the specified number of failed requests in a row is reached, a redundant server will start.
Request timeout (milliseconds) is the time between requests within a TCP session.
Failover timeout (milliseconds) is the calculated parameter defining the time between detecting a problem on a primary server and failing over to a redundant server.
Setting conditions for the server deactivation is a functionality that provides switching to the redundant server if one of the specified conditions is satisfied. Deactivation settings are applied to the current server and other servers in a redundancy group. There are the following conditions for deactivation of the server and subsequent switching to the redundant server:
No input streams detected — when this condition is chosen, the server will be deactivated if there are no input streams for all active consoles.
Failure of publishing segments over WebDAV — when this condition is chosen, the server will be deactivated if all active consoles fail to publish OTT segments via WebDAV to the origin server.
CPU Usage — when this condition is chosen, the server will be deactivated if the specified CPU load threshold is exceeded within the set period.
The Action if conditions are met setting helps to configure the server behavior. If one or some conditions occur, a server can become a redundant server or go to a deactivated state.
Note
You can set a server as a redundant one only for 1+1 redundancy mode.
Stream Encryption
Note
The description below uses the following terminology:
Conditional Access System (CAS) controls subscriber access to broadcast services.
Entitlement Control Message (ECM) is a CAS message containing an encrypted control word (CW) for descrambling the stream.
Entitlement Control Message Generator (ECMG) is a CAS part that generates ECM messages.
Entitlement Management Message (EMM) is a CAS message containing service data, access information, and special commands (e.g. for changing the subscription, updating the operational key, etc.).
Entitlement Management Message Generator (EMMG) is a CAS part that generates EMM messages.
Scrambling Control Group (SCG) is a structure gathering together the list of audio and video streams scrambled at the same time with the same control word as well as the list of ECMs with the identifiers of their respective CA systems and with their respective access criteria.
Elecard CodecWorks supports stream encryption with a BISS key as well as by means of different conditional access systems (CAS SimulCrypt).
Encryption can be configured both in new and existing tasks.
In case of new tasks, open the configurator by clicking Create Task, then add a source and configure the settings in the Transform section.
For existing tasks, open a task by clicking on its name on the home page, then click in the top-left corner of the task page that opened.
Note
Encryption is handled by the MPEG Multiplexer component. To ensure the component is included in the schema, streaming must be done via UDP, SRT, RIST, or RTP protocol.
Switch to the Output section, then open the MPEG Multiplexer tab to the right, if unopened. Next, move to the SimulCrypt tab.
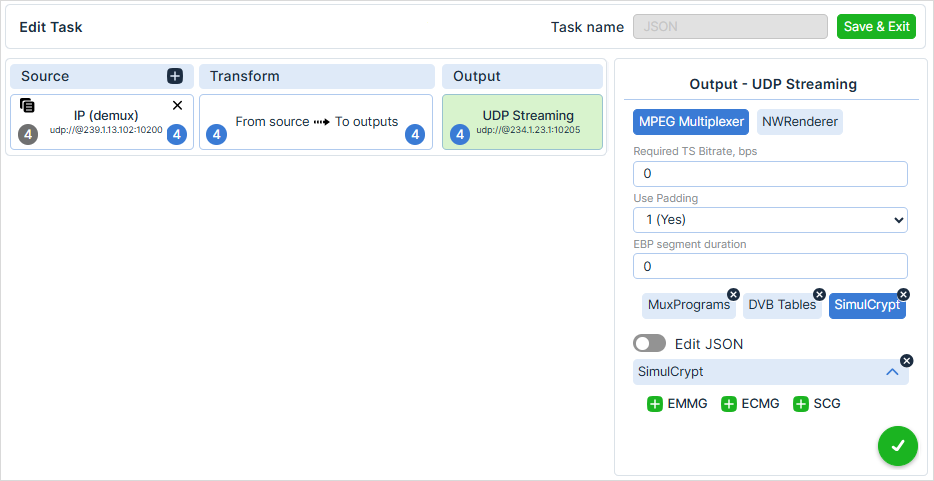
Encryption parameters can be set within the interface or directly in a JSON schema. To enable the schema editing mode, use the Edit JSON toggle. After setting everything up, click Save & Exit in the top right corner.
Configuring BISS Encryption
To enable stream encryption with a BISS key, start off with adding an SCG group by clicking on SCG.
Add an Entry, then add an ECM stream and a stream element by clicking ECM_Group and then ECM_Group_Element.
Next, fill out the CA_system_ID field with a secret key.
Configuring SimulCrypt Encryption
Configuration requires several steps described below.
Adding a Connection to an EMMG
EMMG connection is required for the multiplexer could receive a data flow from the CAS EMMG and insert the data in the transport stream. The data can be either EMMs or PDG-created private data (PD) related to the CAS.
Add a connection by clicking EMMG, then Entry.
Fill out the required fields, see the table below for more info:
Parameter |
Type |
Description |
Example |
Required |
|---|---|---|---|---|
name |
String |
Data stream name for easy debugging |
CAS 1 |
No |
address |
String |
Multiplexer IP address |
10.20.0.3 |
No |
port |
String |
Multiplexer port number |
5008 |
No |
client_id |
Number/HexString |
ID of the EMM/PD generator connected to the multiplexer; supplied by the CAS provider |
0x4ae10003 |
Yes |
data_id |
Number/HexString |
Data stream ID; supplied by the CAS provider |
0x50 |
Yes |
data_type |
Number |
Data stream type. Possible options include:
0: EMM
1: Private data
2: DVB reserved (ECM)
|
1 |
No |
bandwidth |
Number |
Maximum data bitrate in kbit/s |
50 |
No |
data_PID |
Number/HexString |
Stream PID |
420 |
No |
CA_system_id |
String |
A parameter used for setting up a CA descriptor in a CAT if |
0x7be0 |
No |
allow_duplicates |
Boolean |
Allows or disallows creating streams with identical settings |
true |
No |
You can add multiple connections for various CA systems via the Entry button.
To delete a connection, click  .
.
Adding a Connection to an ECMG
ECMG connection is required for the multiplexer could send encryption keys to the ECMG, receive ECM messages from it and insert them under a certain PID in the transport stream.
Add a connection by clicking ECMG, then Entry.
Fill out the required fields, see the table below for more info:
Parameter |
Type |
Description |
Example |
Required |
|---|---|---|---|---|
name |
String |
ECM generator name for easy debugging |
CAS 1 |
No |
Super_CAS_id |
HexString |
ID of a CAS that the multiplexer is trying to connect to; supplied by the CAS-system provider |
0x4ae10003 |
Yes |
host |
String |
ECM generator IP address |
10.20.0.4 |
Yes |
port |
String |
ECM generator port number |
4444 |
Yes |
You can add multiple connections for various CAS using the Entry button.
To delete a connection, click .
Adding a Closed-Access Group
Add an SCG by clicking SCG.
Add an Entry, then add an ECM stream and a stream element by clicking ECM_Group and then ECM_Group_Element.
Fill out the required fields, see the table below for more info:
Parameter |
Type |
Description |
Example |
Required |
|---|---|---|---|---|
name |
String |
ECM stream name for easy debugging |
CAS 1 |
No |
Super_CAS_id |
HexString |
ID of a CAS that the multiplexer is trying to connect to; the value has to be the same as |
0x4ae10003 |
Yes |
ECM_id |
String |
ECM stream ID |
3 |
Yes |
access_criteria |
String/HexString |
Data related to CAS and required by ECMG to create ECM messages; supplied by the CAS provider |
0301010000 или 0x0301010000 |
Yes |
ECM_PID |
String |
ECM stream PID |
421 |
No |
CA_system_id |
String |
A parameter used for setting up a CP descriptor in a PMT in case |
0x7be0 |
No |
Multiple elements, streams and/or groups can be added to support various CA systems.
To delete an element, a stream and/or a group, click .
Events System
The CodecWorks events system notifies users about changes in the task or input stream state and reacts to said changes.
A set of recommended events is pre-configured in the system. You can select one of them or create an event from scratch, if needed.
How the Events System Works
The system lets you work with objects of different levels: you can track the state of the entire encoding schema, schema component, component parameter, or parameter pin. The user chooses an event, sets a target object for monitoring and specifies conditions that the object state analysis will be based on. The system receives data from the target object, performs an analysis based on the specified conditions, and determines the current state of the object.
There are three state types:
Good—target object operates normally.
Bad—target object is facing irregularities.
Signal—a call from the target object that is made every time a certain event, such as a log write error, occurs.
If the object state changes, the system notifies the user. Additionally, the user can set an action the system will perform in response to the state change, e.g., create a log record.
Events Page
In order to create or configure an event, first access the Events page. To access it, start off at the CodecWorks home page, then in the top-right corner click Settings ➝ Service Settings. To the left, click on Thresholds, then open the Events tab.
On the left side, you will see a list of pre-configured events for monitoring common issues:
Decoded video frames—decoded video not found.
Decoded audio frames—decoded audio not found.
Video—video not found
Audio—audio not found
CC errors—CC errors present in the stream
Input state—input data not found
OTT output state—output OTT data not found.
Encoded video frames—encoded video not found.
Unavailable interface—interface unavailable.
Master playlist is changed—changes in the master playlist.
Stream TS data—data not found.
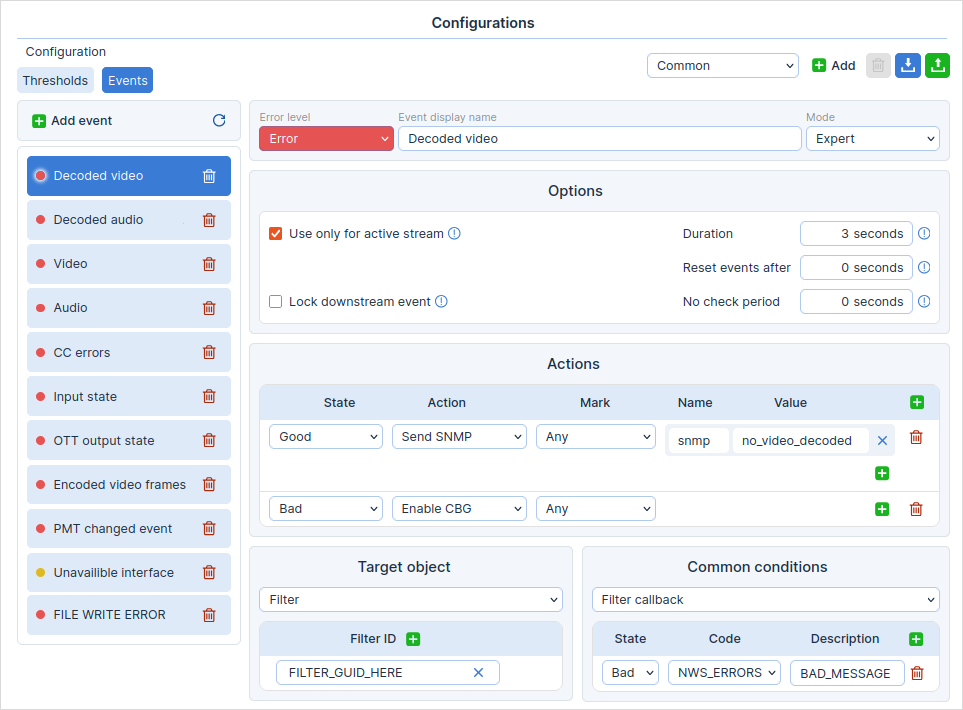
To the right from the list is the area for editing the event configuration. For example, you can specify the event name in the Event display name field. In the Error level drop-down list, you can set the error criticality level: Major, Fatal, Error, Warning, Info, and Unknown. In the Mode drop-down list, the event configuration mode can be specified:
- Basic lets you browse and configure Conditions for determining the target object state, but you cannot configure the condition type.
- Expert lets you specify and change conditions, options, actions, and Target Objects.
Options
In the Options section, you can set the following:
Use only for active stream enables event monitoring only in the active stream, in tasks with a redundant source present.
Lock downstream event disables the monitoring for events that are located on the graph after the event with the bad state.
Duration sets the time period during which a specified condition should or shouldn’t be met in order to let the system register the corresponding state.
Reset events after sets the period after which the event will be reverted to its initial state.
No check period sets the period after the schema is run, during which no event monitoring is done.
Actions
In the Actions section, you can set system reactions to states. The list of actions is presented as a table. The table rows include the following drop-down lists:
State lets you select a state that would trigger an action.
Action lets you select an action.
Mark lets you select a schema type: any or with/without redundancy.
To add a row, click in the right part of the table header.
To delete a row, click .
Users can set the following actions:
Visual alert/Enable sound notification
Enable/disable CBG
Record input stream
Record log
Run/stop stream
Start Python script
Send SNMP
Restart console
Switch to redundant source
Rebuild task
Create input buffer dump
Create process dump
Some actions require you to provide extra data. With this in view, the table makes it possible to add extra fields:
Name lets you specify the name of an argument for passing extra data.
Value lets you set data value.
To add new fields, click in the row you need.
The actions that require extra data include:
Send SNMP: here you have to set
snmpas the name and one of the trap types mentioned below as the value. Note that the type depends on the specified state.State
Value
Good/Bad
no_video_signal—video signal not foundno_video_decoded—video not being decodedno_video_encoded—video not being encodedno_audio_signal—audio signal not foundno_audio_decoded—audio not being decodedno_audio_encoded—audio not being encodedno_input—no data at the inputno_output—no data at the outputts_errors—multiplexer facing CC errorsgenerating_color_bar—CBG enabledgenerating_silence—audio stream replacement enabled (silence)webdav_error—WebDAV errorvideo_decoder_skips—frames skippedno_vmx_key_at_start—encryption server key not found at startno_vmx_key_during_rotation—encryption server key not found during rotationSignal
transcoding_start—encoding startedtranscoding_stop—encoding stoppedchannel_error—console process errorchannel_start_error—error at the start of encodingstream_switch—stream changedtask_start—task successfully startedtask_stop—task stoppedpmt_changed—changes in PMTrebuild_at_start_ok—schema successfully rebuiltrebuild_at_start_fail—schema rebuild failedStart Python script: it is necessary to specify a path to the script. Set
pathin the Name field and the path itself—such asD:\Scripts\python_script.en—in the Value field. If you need to pass arguments to the script, add new fields, setargsas the name then set the argument values.Record input stream: you can set a path to save the stream record. Set
pathin the Name field and the path itself—such asD:\Dump\Test—in the Value field. You can also adjust the dump size by setting thedurationargument as well as the duration value in seconds, such as10.Note
Indicate the schema name at the end of the path. For example, if the schema is named
Mainstream, then the path should look like this:D:\Dump\Test\MainStream.The default path is
\CodecWorks\Logs\Dumps\Record, with the duration being30seconds.
Target Object
In the Target object section, users can indicate the monitored target object. The following objects are available:
Schema—the entire encoding schema (graph) will be monitored.
Filter—the component state will be monitored. To add a component for monitoring, enter its name (GUID) in the field under the Filter ID header. You can monitor the state of multiple components simultaneously as part of the same event. In order to insert fields for adding extra components, click
next to the header.Parameter lets you monitor the state of a component parameter or a component pin. To set monitoring up, specify the component name in the Filter ID field, then the parameter name in the Parameter ID field.
A schema can include multiple components that are the same. To explicitly distinguish the component with the monitored parameter, you can specify a custom name for the component in the Filter name field. If you have to monitor the parameter pin, tick the Profile parameters checkbox. You can include multiple parameters in monitoring by clicking
.
To delete a parameter, click .For each parameter, it is possible to set a specific condition for monitoring the state of this particular parameter. Open the Conditions list and choose the item you need. Click the
icon to collapse or expand the settings for the chosen condition.
To learn more about the settings, see Conditions below.Filter is unknown lets you monitor the component parameter state in case the component is unknown or if there are too many of them. Ensure you set the Parameter ID. You can additionally exclude components out of monitoring by specifying their names in the Exclude filters field. To monitor the parameter of a component pin, tick the Profile parameters checkbox.
Conditions
In the Conditions section, the user sets conditions, based on which the system will determine the state of the target monitoring object. Conditions vary based on which object you choose.
For the Schema target object, the GST graph callback condition is available: the system checks the code of a message sent by the graph and notifies the user about a change in the graph state. The condition is set by means of three fields. In the State field select the state, then in the Value field set the message code for the selected state, finally in the Description field enter a notification for the user. See the list of codes here. You can create multiple conditions with various messages. To add a new condition, click
.
To delete a condition, click .For the Filter target object, the Filter callback condition is available: the system checks the code of a message sent by the component and notifies the user about a change in the component state. In the State field select the state, then in the Code field set the message code for the selected state, finally in the Description field enter a notification for the user. To add a new condition, click
.
To delete a condition, click .For the Parameter and Filter is unknown target objects, three condition types inside a drop-down list are available:
Lower and upper thresholds—the user sets the parameter lower and/or upper threshold. The system compares the data received from the object to the thresholds and determines the object state. To set the lower threshold, tick the checkbox near the corresponding field and enter the required value. If needed, do the same for the upper threshold. If you tick the Relative checkbox, then instead of the current parameter value, the difference between the current and previous value will be compared to the threshold values. The Notify via signal checkbox enables notification sending when the event occurs. In the Good description and Bad description fields, the user can specify messages about the target object state that will be displayed in the interface.
Boolean expression works similar to Lower and upper thresholds, except that the thresholds are specified via expressions, such as
( {VALUE}>2 AND {VALUE}<100 ) OR {VALUE}=0instead of fields. The following operators are supported:Logical AND: AND, and, &&
Logical OR: OR, or, ||
Equality: =, ==
Logical NOT: !
The system will replace the
{VALUE}tag with the parameter values, meaning the tag should always be present in the expression.Special—a special condition for monitoring the state of WebDAV URL addresses. The All or nothing checkbox determines how the system would identify the state. With the checkbox ticked, the system would determine the state as Bad in case at least one URL is invalid. With the checkbox unticked, the system would determine the state as Bad in case all URLs are invalid, or as Signal if only some of the URls are invalid. Use the State change description, Good description and Bad description fields to specify the messages for the Signal, Good, and Bad states correspondingly.
Configuring Events
To configure an event, do the following:
Select a required configuration in the Configuration field in the top-right corner of the Events page.
Select a pre-configured event or create your own by clicking
Add Event above the events list.If needed, specify the Event display name and Error level.
Switch over to expert mode by choosing the corresponding option in the Mode drop-down list.
In the Target object section, choose an object for monitoring and configure it.
In the Conditions section, specify conditions that the system would use to monitor the state of the selected object.
Enter the messages that would show up in response to various states.
In the Options section, enable the required monitoring options.
In the Actions section, set how the system would react to states within the specified event.
Check parameter settings. If needed, you can restore the default settings by clicking
 on top of the events list.
If all is set correctly, click Apply in the top-right corner.
on top of the events list.
If all is set correctly, click Apply in the top-right corner.Apply the configuration to a schema.
Events Journal
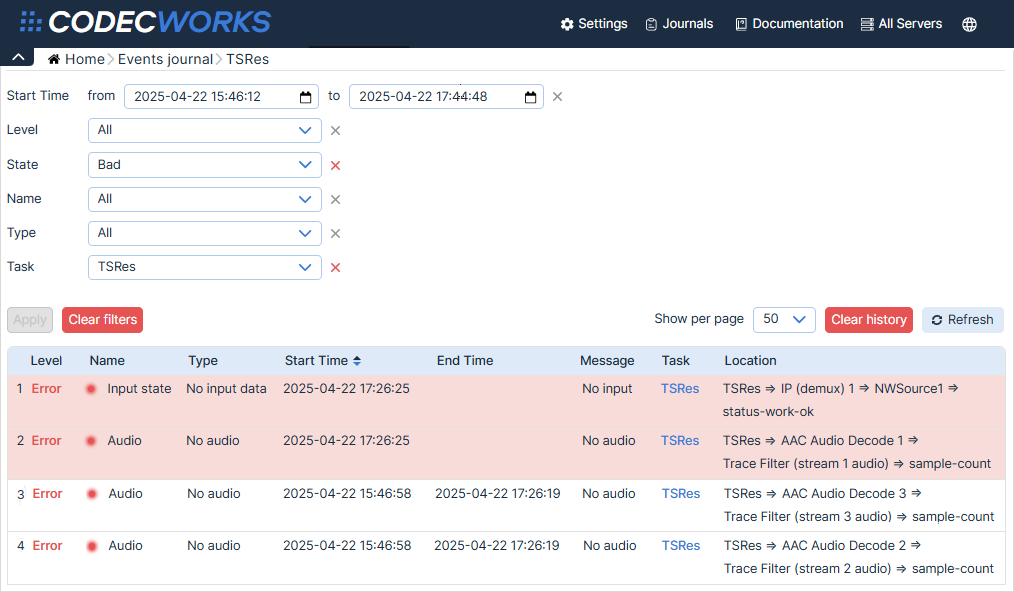
Events journal shows records about events registered in the system, keeps the history of notifications, and creates event-based logs. By default, the events in the journal are divided into two types: current events that are active at the time the journal is browsed, and complete ones. Current events are always on top and are additionally highlighted with color. By relying on the journal, the user can track active events to address them timely, analyze previous events, and browse the notification history.
To open the events journal, start off at the CodecWorks home page, then hover over the Journals tab in the top-right corner and click Events Journal.
You can also open the journal by clicking  in any task row.
In this case, the journal will display data related to events for this particular task.
in any task row.
In this case, the journal will display data related to events for this particular task.
You can filter the data in the journal using filters on top. To enable the selected filters, click Apply. To reset, click Clear Filters.
The journal comprises 8 columns:
Level shows an event criticality level: Error or Warning.
Name shows an event name.
Type shows an event type.
Start Time shows when an event started.
End Time shows when a completed event ended.
Message shows the message set for a certain event state.
Task shows the name of a task. Click the name to open the task page (graph).
Location pinpoints the path to the target object inside the graph where a certain event took place.
As the amount of data increases, the records are paginated. To browse through the records, use the navigation under the journal.
You can set the number of items to be shown via the Show per page field to the right and above the journal. To update the journal data, click Refresh. To delete data, click Clear history then confirm deletion in the pop-up window. If the journal has no data to provide, the No events to display message will be shown.
Template Configurator
By default, CodecWorks contains templates with pre-configured encoding settings. Users can edit these templates to fit custom requirements or create their own templates from the ground up. To open the template configurator, start off at the CodecWorks home page and click Create Template in the top-right corner above the task list.
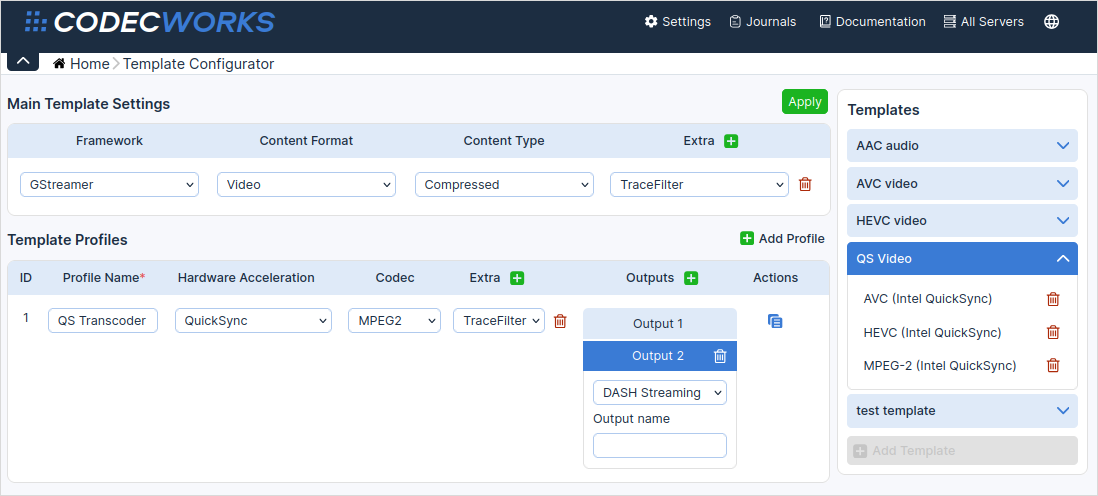
When on the configuration page, to the right, you will see drop-down tabs containing templates for various task types.
Click on a certain template name to open configurable parameters on the left side.
If you make changes and then try to move to another template without saving, the system will warn you that your changes will be discarded.
To delete a template, click .
You can create your own template by clicking Add Template.
Next, configure all the necessary main template settings and profile settings.
The main settings include the following drop-down lists:
Framework lets you specify a framework underpinning the components.
Content Format lets you specify the data format, i.e. video, or audio.
Content Type lets you specify whether the input data is Compressed or Uncompressed. The compression type determines the task that will be performed and, correspondingly, the profile settings. Selecting Uncompressed will enable encoding, while Compressed will enable transcoding.
Extra lets you add one or more component(s) for the entire template. To add a component, click
and select the required option from the drop-down list.
To delete a component, click .
After configuring the main settings, set up the template profiles:
Profile Name lets you set the profile name.
Hardware Acceleration lets you set the acceleration type for encoding/transcoding. QuickSync and Nvidia hardware acceleration as well as CPU-based software (Soft) acceleration are available.
Codec lets you choose a specific codec. The set of options depends on the value in the Hardware Acceleration field: QuickSync and Soft support MPEG2, AVC, and HEVC, while Nvidia supports AVC and HEVC only.
Extra lets you add additional components to this particular profile. To add a component, click
.Outputs lets you set one or more outputs in this profile, for example, to support different streaming protocols. The preferred protocol can be selected from the drop-down list. If needed, you can explicitly indicate the output name. To add more outputs, click
.Actions contains the
 button that creates a copy of the current profile with all the settings.
To create more profiles, click Add Profile and adjust the required settings.
Once done with settings, click Apply. The page will show fields where you can configure component parameter values in the main branch as well as in the profiles. Located to the left and above the fields are the tabs with component names: you can switch between them to configure each component. To the right are the Recommended Values and Default Values buttons. Click the first button to fill out the fields with recommended parameter values; click the second button to restore the default values.
After specifying the required settings and parameters, enter the template name in the corresponding field located in the top-right corner on top of the template. Located to the left from the field is the Template group drop-down list—here you can add the template to a certain group. If no group fits, create one by clicking Add group in the drop-down list and then name it. Click Create Template, and it will appear in the list to the right. After creating a template, you can use it while configuring new or existing tasks, but not the ones that are currently launched. To do that, access the Transcoding section and select the template you need from the drop-down list under the stream name.